Wide dynamic range
Summary
Scenes that contain both very dark and very bright areas are challenging for a camera. Typical examples of such wide dynamic range (WDR) scenes in security include entrance doors, parking garages, and tunnels, where there is a large contrast between the light from outside and the darker interior. Outdoor scenes with direct sunlight and shadows are also problematic.
Several methods have been developed for cameras to be able to better recreate the full scene content. No single technique is optimal for all scenes and situations, and every method has its drawbacks, including the introduction of various visual anomalies referred to as artifacts.
Axis offers different WDR solutions, including two forensic solutions that constitute a revolutionary improvement in the imaging of difficult scenes with high contrast. Their ability to make details visible in the dark parts of a scene, without over-exposing the bright parts, is unparalleled, and provides images with exceptional forensic value.
Axis WDR solutions include Forensic WDR, WDR - forensic capture, WDR - dynamic capture, and WDR - dynamic contrast. Most Axis cameras use Forensic WDR, which is a dual exposure-based method. When that is turned off, the cameras automatically switch to WDR - dynamic contrast.
Some Axis cameras use unspecified combinations of these various methods for extending the dynamic range. In these cameras, the WDR solution is tailored to each specific camera and is denoted ”WDR” in datasheets and other product information.
The dynamic range capability of a camera is usually specified as a dB value, but actual WDR performance is difficult to measure and also depends on other factors, such as the complexity of the scene, the amount of movement in the scene, and the image processing capability of the camera.
During camera development, Axis prioritizes forensic usability and image quality over measuring and stating a high dB value. Due to this prioritization, an Axis camera with a certain specified dynamic range could very well outperform a competing camera that has a higher dB value.
Introduction
Cameras traditionally struggle with scenes of wide dynamic range, that is, scenes that have a lot of variation in light levels. This white paper explains the technology behind the dynamic range limitations of a camera, describes the available general methods for achieving good WDR performance, and presents Axis WDR solutions for video with maximal forensic value and usability.
Wide dynamic range scenes
Dynamic range refers to the difference in light levels between the darkest and the brightest areas of a scene or an image. Therefore, a scene with a wide dynamic range contains both very bright and very dark areas simultaneously. Typical examples in surveillance include:
Entrance doors with daylight outside and a darker indoor environment.
Parking garages or tunnels, with daylight outside and low light levels indoors.
Outdoor scenes with direct sunlight and shadows.
Office buildings or shopping malls with a lot of reflected light from windows.
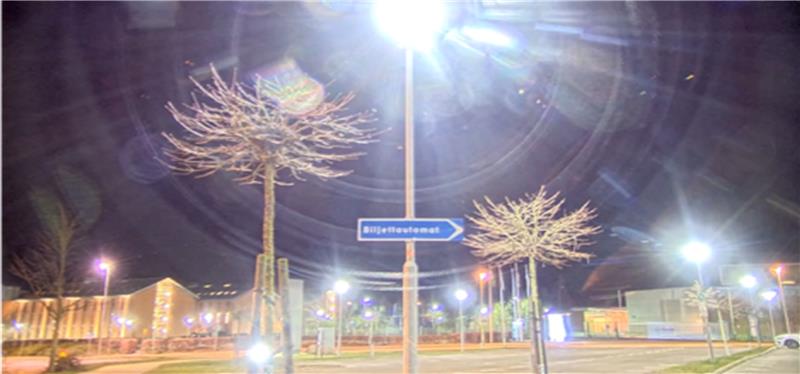
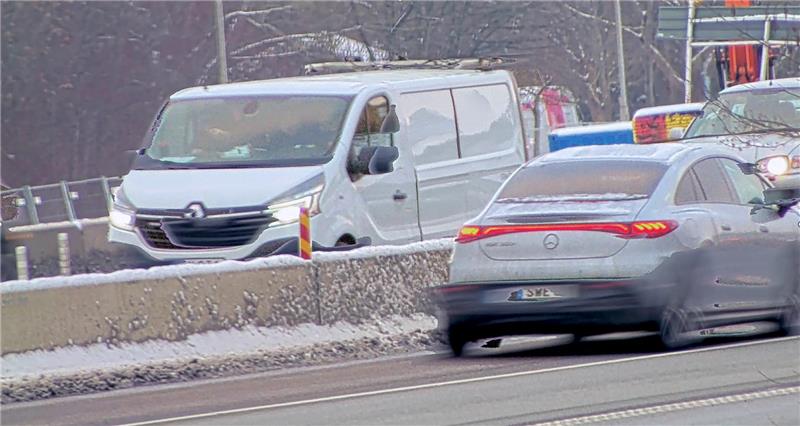
Below is an example of a scene with a wide dynamic range, captured using a surveillance camera without the technology to handle WDR scenes.
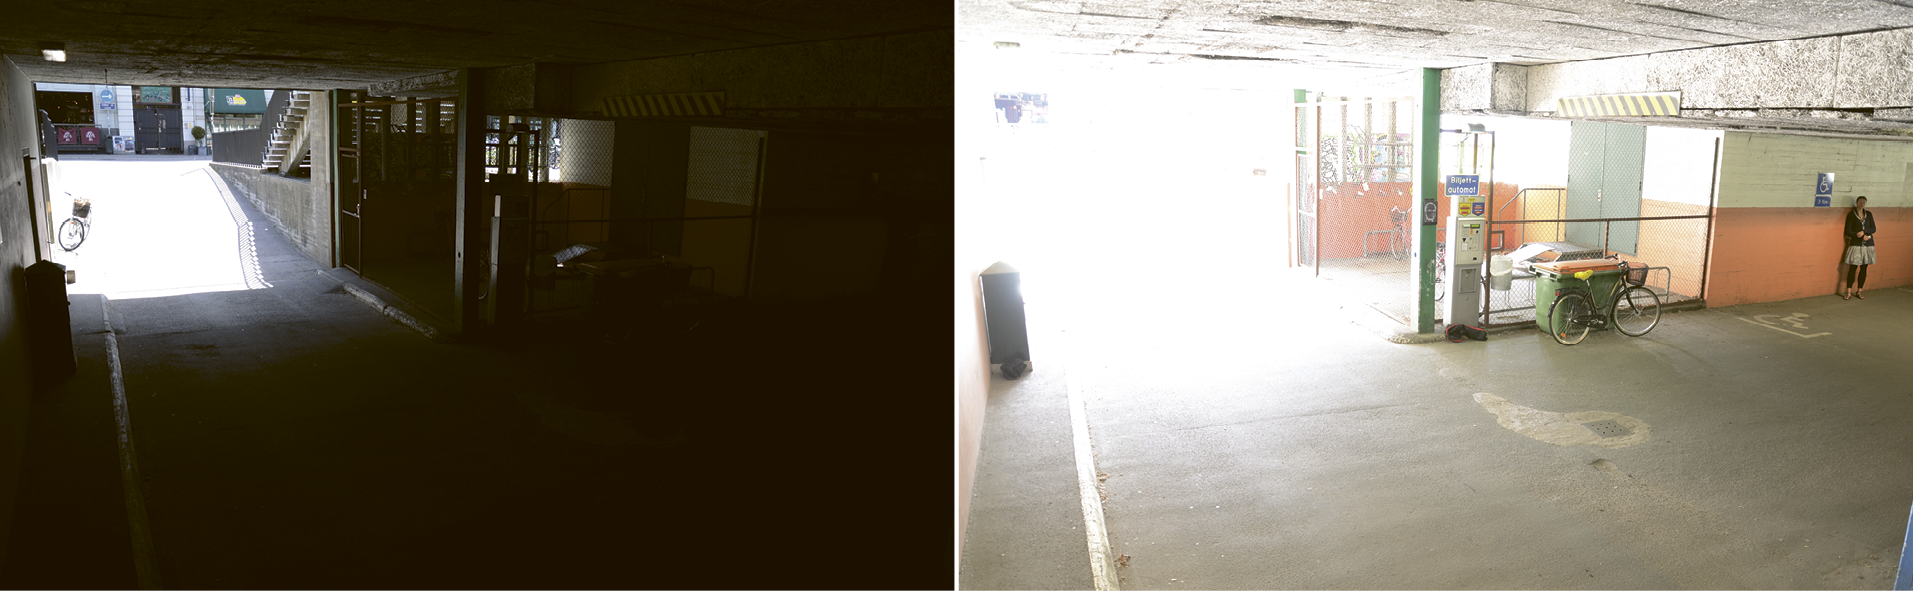
The camera can, depending on which exposure time is used, either make visible the well-lit entrance and bright exterior, or the dark interior of the garage. A camera without WDR capability cannot capture the full scene content in one image.
The images below have insets from the short-exposure image in the long-exposure image, and vice versa. It is evident that important objects in the scene were missed by the camera without WDR capability.
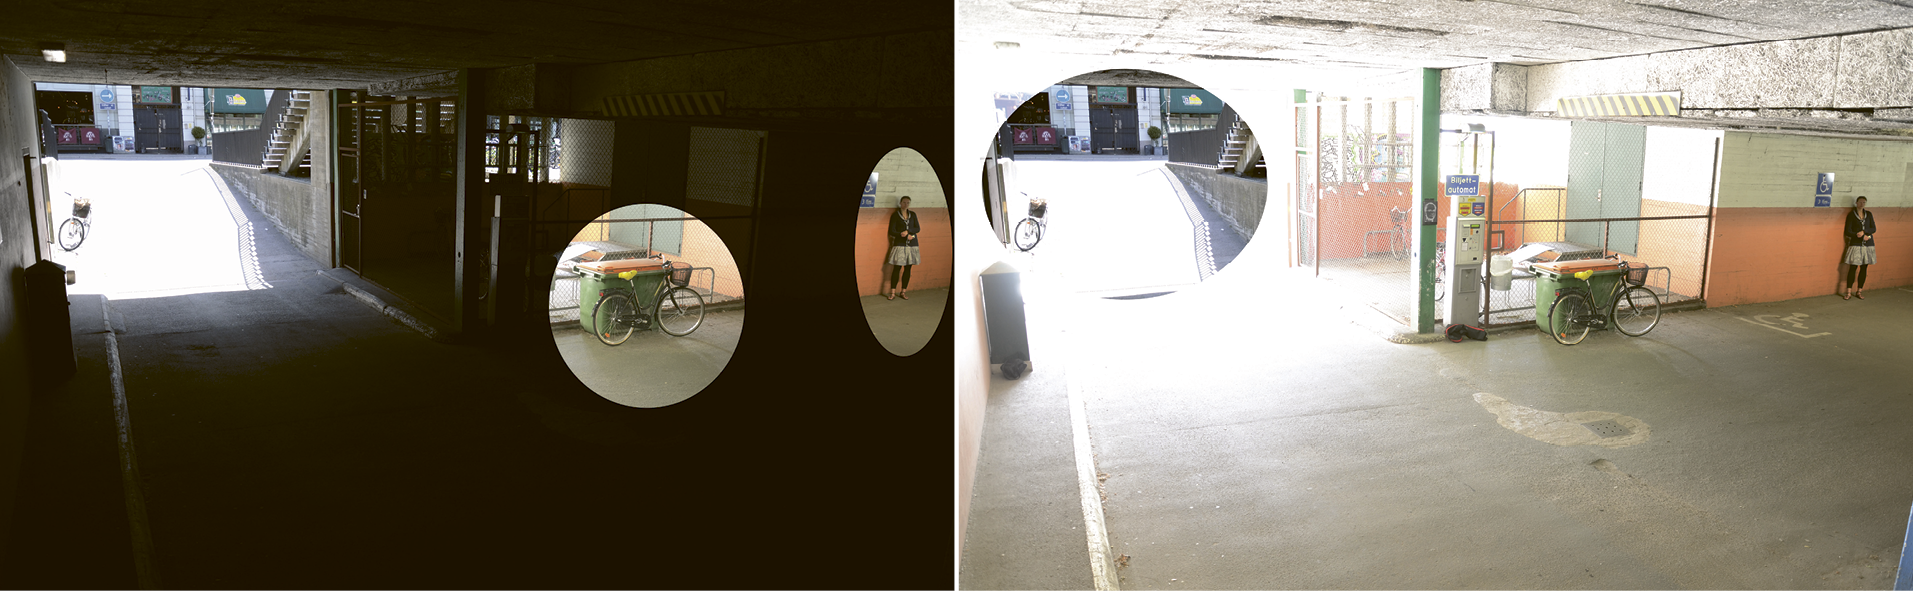
To be able to capture the full scene content, a WDR-capable surveillance camera is needed. It can, in one image, capture both extremes, i.e. clearly show details both in the well-lit entrance, and the dark shadows inside the parking garage. Without WDR capability, the camera can only produce a usable image in either the dark or bright area of the scene and the other area would be underexposed or overexposed.
Physical limitations of a camera's dynamic range
The main reasons for the limited dynamic range of a camera are related to how light is captured in the camera sensor, how the images are processed, and also the nature of light itself. Described in more practical terms, the dynamic range depends on pixel size, exposure time, noise, and bit depth.
Pixel size and exposure time
Light is made up of discrete bundles of energy, called photons. When the light intensity in a scene is increased, it means that a higher number of photons will travel toward the camera. However, a camera, or rather its image sensor, can detect only a limited number of photons per exposure interval.
The image sensor is made up of millions of photo sensitive spots, called pixels, which are capable of converting captured photons to electrons. When the camera is forming an image, the electron count for each pixel is measured, providing information about the light levels in different parts of the captured scene.
Each pixel has a set size and can hold only a set number of electrons before it is saturated. In a modern camera, we want to maximize the number of pixels but, for cost reasons, keep the total sensor size down, effectively limiting the pixel size.
For a wide dynamic range scene, a long exposure time will make pixels saturated in the brighter parts of the image. By reducing the exposure time, and collecting photons over a shorter time, photon overflooding in the brighter parts can be avoided. However, a shorter exposure time may also mean that only very few photons will be captured in the darker areas. Due to the particle characteristics of light, and a phenomenon referred to as photon shot noise, these areas of the image will be visibly noisy. The correct exposure time for a pixel is one that maximizes the signal-to-noise ratio (SNR), and therefore, it is shorter for pixels located in brighter parts of the image than for pixels in darker regions.
Noise and bit depth
At pixel level, dynamic range is defined to be the maximum signal divided by the noise floor. The noise floor determines the lowest signal intensity that can be discerned above the intensity of the total sum of all noise sources. Some of the noise originates in imperfections in the analog-to-digital converter that is counting the electrons and generating a reading per pixel. Another type of noise is the photon shot noise, which is impossible to avoid even with perfect equipment. All noise results in pixel values that do not reflect the true intensities of the real scene.
The bit depth depicts the number of bits used to capture the information in one pixel, determining the number of possible light levels that can be detected. Security cameras will typically have a bit depth of 10 bits. A larger bit depth would theoretically increase the number of light levels that can be detected, but in reality, it will increase the image quality only if the sensor pixels are large enough and the noise is low enough. If the sensor data is noisy, there is not much to win by increasing the number of bits.
Displaying the image
Regarding bit depth, it is also important to keep in mind that the typical monitor, on which a security professional will view the surveillance video, has a bit depth of only 8 bits per color channel. This means that the algorithm to translate from 10 bits in the sensor to the 8 bits in the monitor is critical in achieving good WDR performance.
General methods for extending a camera’s dynamic range
Different methods have been developed for circumventing the dynamic range limitations in a camera, and achieving good WDR imaging. The methods are sometimes combined to create a better result. No single method is optimal for all applications, since each method introduces different visual anomalies, so called artifacts. Artifacts that may not be visible in one application, can be a complete show-stopper for another. See Chapter 7 for descriptions of frequently occurring artifacts.
Using dual or multiple exposures
Using a merging algorithm, multiple images captured with different exposure times can be combined to form one single image. This is the most common method for extending the dynamic range. However, due to the sequential capture, this method introduces artifacts related to motion in the scene. Typically, rapid motion may be problematic, since the two exposures can’t be merged due to objects not being in the same position between the two captures.
Dual exposure requires two exposure times; one, very short and the other, long. Since the short exposure time can not be synchronized with all types of different modern artificial lighting (LEDs), flickering of the bright part of the image may be very visible.
Common artifacts caused by dual exposure include:
Flickering
Motion blur and ghosting
Noise in the dark parts of the scene
Unintuitive noise in the middle gray parts of the scene
Using dual or multiple sensitivity pixels
With this method, the camera uses an image sensor that contains two, or more, types of pixels, with different light sensitivities. Thereby, one single exposure can essentially create two images, one darker and one lighter, one for each set of pixels. The final image is created in real time by combining these images using a merge algorithm and tone mapping. There are usually restrictions, for example a fixed sensitivity ratio, on how different the sensitivities of adjacent pixels can be, limiting the dynamic range that can be achieved with this method. Owing to the simultaneous exposure, artifacts related to motion and flickering are avoided, but other types of artifacts may be introduced instead. For instance, the decreased resolution caused by this method (since fewer pixels can be used to form the image), can create moiré patterns and staircase effects in the image. Also, the processing to combine the two sets of pixels may be complicated and, in some cases, cause other problems. Typical artifacts:
Moiré patterns and staircase effects
Noise
Blurriness
Using contrast enhancement
This is a digital method using an under-exposed image, and digitally making the darkest areas lighter. The method does not truly extend the captured dynamic range, but enables improved detection possibilities in the final image, especially in otherwise over-exposed areas. It is very useful for scenes with limited dynamic range and a lot of motion. Typical artifacts introduced include:
Unintuitive noise in the darker areas
Very few grey levels in some areas
Unnatural colors
Using local contrast enhancement
Traditionally, cameras use global methods to adjust the tone curve, which means that the same transform is used for all pixels in the image. It is also possible to use a local method, adjusting the tone curve differently in different areas of the sensor. This does not truly extend the captured dynamic range, but provides a powerful visualization tool by moderating the contrast, creating a better look on a screen with low dynamic range. Typical artifacts depend on how intensely the method is used, and can include:
Ghosting
Cartooning
Lack of contrast
Excessive colors
WDR imaging in Axis cameras
Axis offers several solutions for WDR imaging, combining some of the general methods described in the previous chapter with state-of-the-art image processing and procedures to reduce artifacts.
WDR performance described by Axis
At Axis, we have selected a few key aspects for rating our WDR solutions. When determining which solution is suitable for a specific surveillance case, the aspects should be weighted differently according to the circumstances of the case. The evaluation of the aspects is based on real usage and subjective judgement.
| Aspect | Meaning |
| Motion | How well are artifacts related to motion and flickering avoided? |
| Reach | The practical dynamic range. Related to the dB value. |
| Appearance | How well is the image reproduced in a difficult scene? |
The motion aspect rating summarizes the solution’s capability of capturing a scene with motion, without introducing artifacts that are related to the sampling technique. Treatment of flicker is one important factor in this aspect, another is avoiding merging artifacts.
The reach aspect rating summarizes how large the difference in brightness can be between the brightest and the darkest part of the image, while the surveillance usability of the image is maintained.
The appearance aspect rating summarizes the solution’s capability of reproducing the difficult light conditions, but still render an image that is usable for viewing by security staff on a computer monitor. The aim is not to reproduce the scene with as high fidelity as possible, since that would hide details for the viewer.
Axis WDR solutions
A camera’s dynamic range is usually specified by a dB value, which is related to the reach aspect described in the previous section. In order to provide usability and detail in typical surveillance scenes, however, Axis WDR solutions prioritize the motion and appearance aspects over the reach aspect. This priority means that Axis cameras may deliver better dynamic range imaging than their dB values imply. Considering the reduced artifacts and the improved usability, an Axis camera with a lower dB value could very well outperform a camera with higher dB value from another company. See Chapter 6 for more details about dB values.
Axis WDR solutions are listed below.
Forensic WDR is a combination of dual exposure and a local contrast enhancement method. It provides images that are tuned for maximal forensic usability. Employing the latest generation of image processing algorithms, this technology effectively reduces visible noise and artifacts. Forensic WDR is also suitable in scenes with motion and in ultra high resolution cameras.
WDR - forensic capture is a combination of dual exposure and a local contrast enhancement method. It provides images that are tuned for maximal forensic usability.
WDR - dynamic capture uses a dual-exposure method for merging images with different exposure times.
WDR - dynamic contrast uses a contrast enhancement method with fairly limited dynamic range but with very few artifacts. Since only one exposure is used, this solution performs well in scenes with a lot of motion.
Some Axis cameras use unspecified combinations of these various methods for extending the dynamic range. In these cameras, the WDR solution is tailored to each specific camera and is denoted ”WDR” in the product information documents.
AXIS WDR solutions are predetermined but you can choose to turn on/off dual exposure. Some buy a camera with Forensic WDR, turn off dual exposure because there is a lot of motion in the scene, and they are then left with using just local contrast enhancement. Some sensors and system-on-chips (SoCs) can’t handle high resolution in combination with dual exposure due to performance. These cameras are limited to using only local contrast enhancement.
On some cameras, frame rate could be increased (sometimes as much as doubled) when dual exposure is switched off.
The table below shows the rating of Axis WDR solutions according to the performance aspects.
| WDR solution | Motion How well are artifacts related to motion and flickering avoided? | Reach How well can the camera handle the difference between the darkest and brightest areas in a realistic scene? (also referred to as dB value) | Appearance How well is the image reproduced in a difficult scene? |
| Forensic WDR | +++ | +++ | +++++ |
| WDR - forensic capture | ++ | +++ | +++ |
| WDR - dynamic capture | + | + | ++ |
| WDR - dynamic contrast | +++++ | - | - |
According to the rating the generally best performing WDR solution is Forensic WDR, improving both the motion aspect and the appearance aspect compared to WDR - forensic capture. However, both these forensic solutions constitute a revolutionary improvement in the imaging of difficult scenes. Their ability to make details visible in the dark parts of a scene, without over-exposing the bright parts, is unparalleled, and provides images with exceptional forensic value.
Since the purpose of the forensic solutions is to prioritize forensic usability, all shadows are brightened and details enhanced, giving the image a look and feel that is very different from what we are used to in, for example, broadcast video. With a Forensic WDR camera, the dynamic range of the scene is compressed into a much lower dynamic range, without losing the details. This optimizes the video for viewing, without eyestrain, in a security center where professional staff work with reviewing live and recorded video.
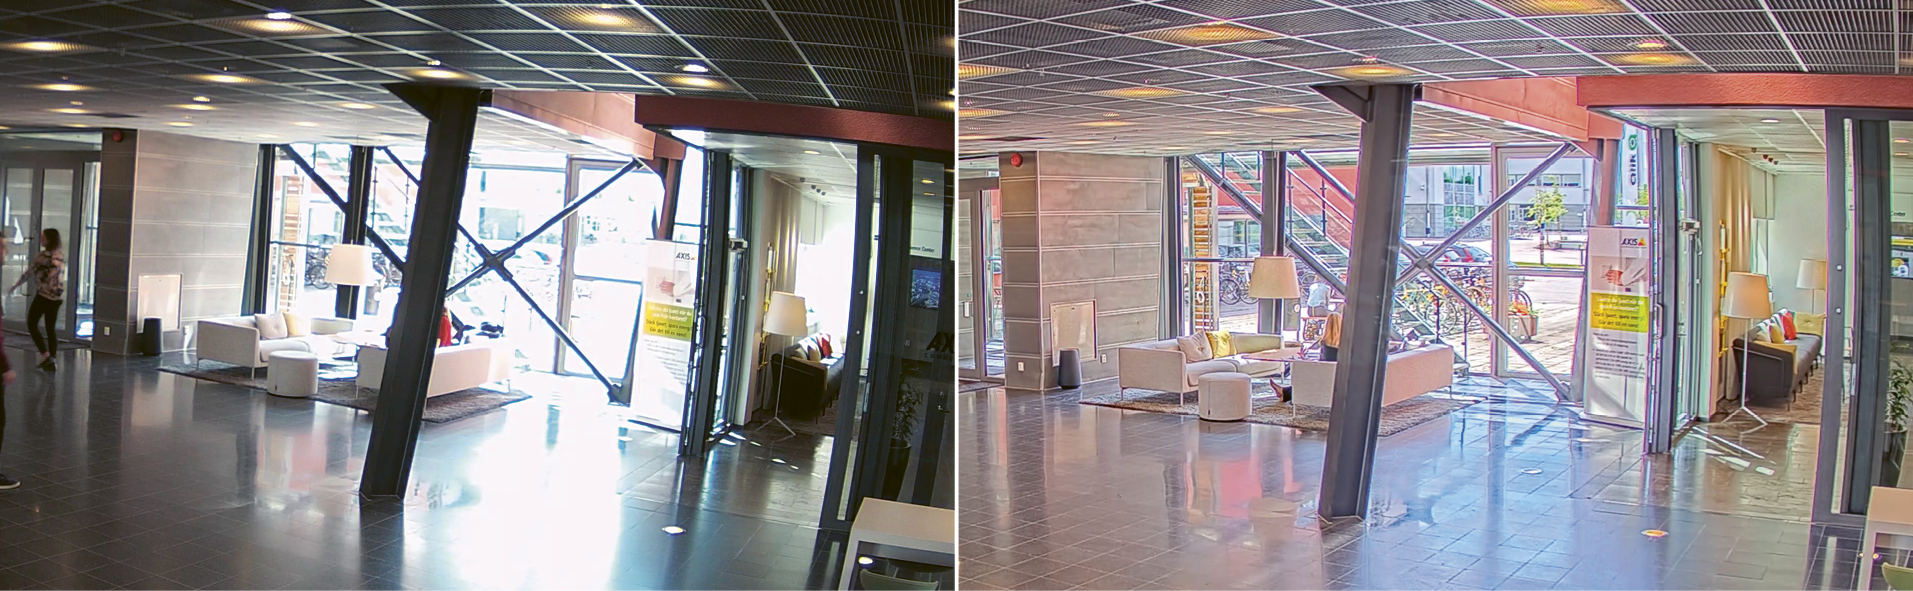
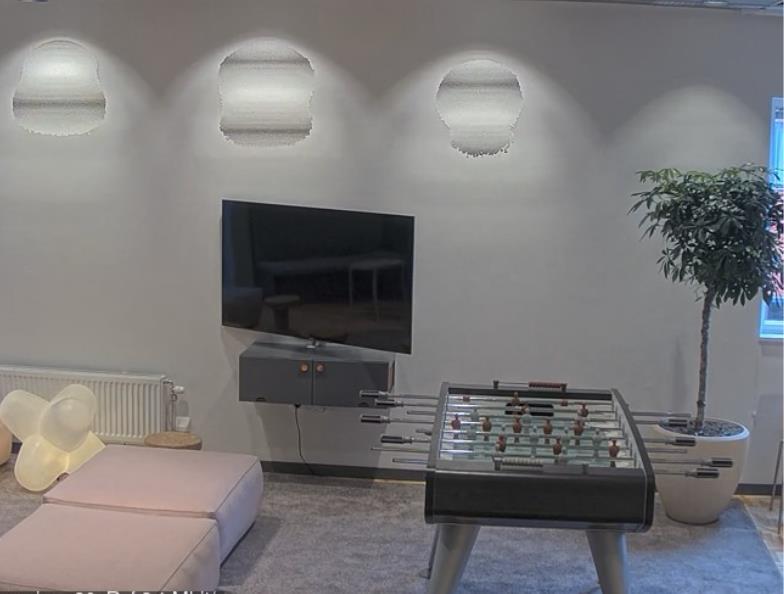
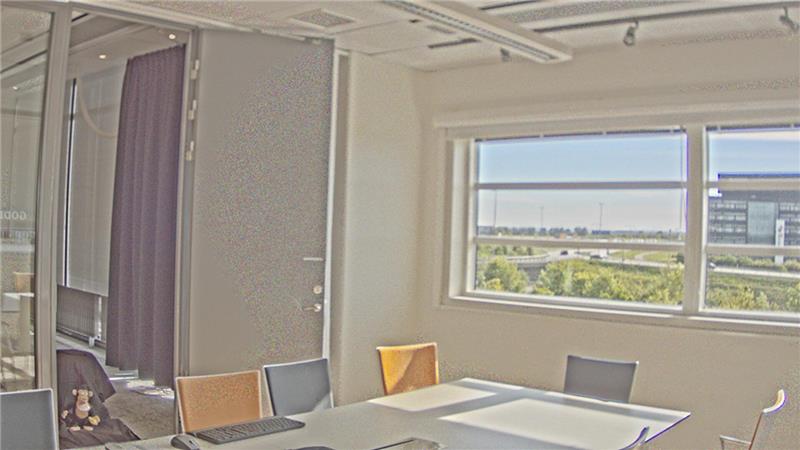
The figure below compares a scene captured with two different cameras: a camera without WDR capability on the left, and an Axis camera with Forensic WDR on the right. With Forensic WDR, details are clear and visible both in the backlit interior and outside.
Dynamic range capability specified in dB
The dynamic range capability of a camera is normally specified as a dB value, related to the reach aspect presented in Chapter 5.
The dB value is a measure of the ratio between the radiance of the brightest object and the radiance of the dimmest object that can be captured by the camera. If the ratio is 1000:1, the dB value is 60 dB, calculated as the logarithm of the ratio (in this case, 3), multiplied by 20.
The dimmest detectable level can be defined as the noise floor of the sensor pixel, since any signal below this level is drowned in noise. With this definition, a good image sensor can normally reach a dynamic range of about 70 dB. Using WDR techniques we can, while not altering the actual dB value of the camera, increase the practical dynamic range, or the reach.
However, neither the dB value nor the reach expresses the full dynamic range capability of a camera. The quality of a WDR image also depends on which WDR method was used, on whether any visible artifacts remain, and on the quality of the image processing. Some of these factors are summarized by the appearance aspect and the motion aspect specified in Chapter 5.
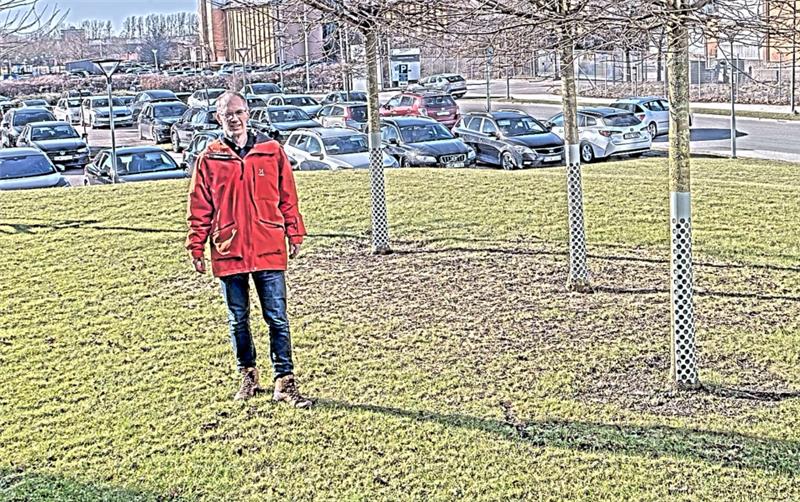
The image to the right below was taken with a camera with a lower specified dB value than the image to the left. In this wide dynamic range scene, the camera with the lower dB value clearly produced an image better qualified for video surveillance, contrary to what might be expected. The lower-dB camera obviously had other features, such as better image processing, that improved its WDR capability.

Artifacts in WDR imaging
This chapter describes some of the most common visual artifacts and their causes.
Motion blur: Motion blur can occur when the image being recorded changes during a single frame, either due to rapid movement in the scene or because the exposure time is simply too long. In WDR cameras that use multiple exposures, different levels of motion blur occur in different parts of the image depending on how bright it is.
Ghosting: When multiple exposures are used to create one image, a moving object may be captured in different locations. This may result in ghost-like effect around moving objects or people.

Artifacts caused by flickering: Artifacts caused by flickering light can appear in all types of cameras. Since a constant illumination is normally assumed, modulated light sources, such as fluorescent or LED lighting, present a challenge. Depending on the camera type, the introduced artifacts may look like stripes or visible pulsing. In WDR cameras using multiple exposures, the effect is usually strongest in the short exposure, which can lead to the flicker becoming extra visible in the image as there can be a sharp transition between areas taken with different exposure times.
Unintuitive noise: When you combine two or more images to form a new image with higher dynamic range, the new image will not have the same noise characteristics as an image with truly large dynamic range. One of the compromises that must be accepted is that the combined image will have more noise than an ideal image. This noise is not evenly distributed across all brightness levels but is worse in the parts where two images have been blended together. If the cameras' noise filters cannot compensate for this effect, the result may be unexpected noise in areas that are expected to be noise-free.
Cartooning and unnaturalness: Scenes with very high dynamic range might be difficult to display on a standard monitor. Sophisticated image processing may try its best to preserve color and contrast, but sometimes, it may not be enough to render the images in a natural way. The result can be strange colors or just a generally unnatural experience.
Purple fringing: Purple, or sometimes blue, fringing, is the effect where sharp, high contrast, edges in the image may get a purple tint due to chromatic aberration in the lens. Chromatic aberration occurs when different wavelengths of the light are not refracted equally in the lens and therefore become slightly displaced or out of focus on the sensor. This effect may be stronger near the edge of the sensor. WDR cameras can be more sensitive to chromatic aberration than other cameras because they are better at preserving color and contrast. Where a non-WDR camera can saturate or overexpose the areas closest to bright light sources, a WDR camera can instead often preserve the color information, which in this case can lead to weaknesses in the optical system becoming more visible.
Lens flares and haze: When light enters any optical lens system, some light will not be collected properly but instead scattered in the lens system. Some of this light will be collected by internal baffles designed to reduce bouncing light, but some of it will also reach the image sensor at the wrong spot, causing different types of artifacts. The most common artifact is the lens flare that is visible in most cameras facing a strong light source, like the sun. Another effect, called haze, reduces the contrast and color saturation on larger areas in the image. Both effects will be particularly disturbing with strong light sources in the image, wide dynamic range scenes, dirty front glass, or dust in the lens system. Installing a weather shield on the camera might reduce both flares and haze. The performance of a WDR camera, i.e. the ability to capture and reproduce scenes with a very high dynamic range, will still be limited by the scattered light in the optical system.